Use this file to discover all available pages before exploring further.
You’ve built a customer-service chatbot. It retrieves policy documents, sends them to an LLM, and generates answers. It works… most of the time. But when a customer gets a wrong answer — like being told they can get a refund when they can’t — you have no way to figure out why. Was the wrong document retrieved? Did the LLM ignore the context? Did the prompt not give clear enough instructions?Without visibility into what’s happening inside your app, every bug is a guessing game. Tracing solves this by capturing every step of every request — retrieval, LLM calls, inputs, outputs, latency, token counts — so you can see exactly what happened and where things went wrong.In this guide, you’ll instrument a simple RAG chatbot and send traces to Arize AX. By the end, you’ll have full visibility into every request your app handles.
This is Part 1 of the Arize AX Get Started series. Each guide builds on the previous one.
We’ve prepared a companion notebook that builds the example chatbot used throughout this series. You can download it here or open it in Colab and follow along, or adapt the steps to your own application.The example app is SkyServe, an airline customer-service chatbot that answers questions about refund policies, baggage rules, rebooking procedures, and a loyalty program. It uses ChromaDB for retrieval and OpenAI for generation — a straightforward RAG setup.Get your Arize credentials. Once you’re logged in, navigate to Settings in the left sidebar, then open the API Keys page. Copy your Space ID from the Current SpaceID field, and create an API Key — give it a Key Name and click Create Key, then save the key somewhere safe. You’ll plug both into whichever path you choose below.
You can start right from the Arize AX UI: create a New Tracing Project and the setup wizard walks you through Choose From 30+ Integrations, then hands you a code snippet — pre-filled with your Space ID — to copy into your app.
Or pick a path below: use Arize Skills to have your coding agent instrument your app from your editor, or Code to wire up the SDK yourself. Every path sends the same traces to your skyserve-chatbot project.
By Arize Skills
By Code
Use Arize Skills with your coding agent to add tracing without writing the instrumentation yourself. Install the skills plugin and follow Set up Arize with AI coding agents for authentication and CLI setup. Then, follow the flow below.
arize-instrumentationInstall the skill and set your credentials so it can wire them in:
npx skills add Arize-ai/arize-skills --skill "arize-instrumentation" --yesexport ARIZE_API_KEY="YOUR_API_KEY"export ARIZE_SPACE_ID="YOUR_SPACE_ID" # the Space ID from Settings > API Keys
Then open your coding agent from your project’s root directory — the skill reads and edits the code in that folder, so it has to be pointed at the app you want to instrument. Ask it to set up tracing. For example, you might say:
Set up Arize tracing in my skyserve-chatbot application
The skill analyzes your stack, picks the right OpenInference package, wires it in (plus manual CHAIN and RETRIEVER/TOOL spans where your app does retrieval or calls tools), and tells you exactly how to verify traces are flowing. Works with Cursor, Claude Code, Codex, and more.
arize-instrumentationAs part of its verification phase, the skill runs your app and triggers a request to confirm spans are flowing. To send a representative batch — straightforward questions plus tricky edge cases — ask your agent to run it again. For example, you might say:
Run the app and send a few sample customer questions so we get traces in skyserve-chatbot
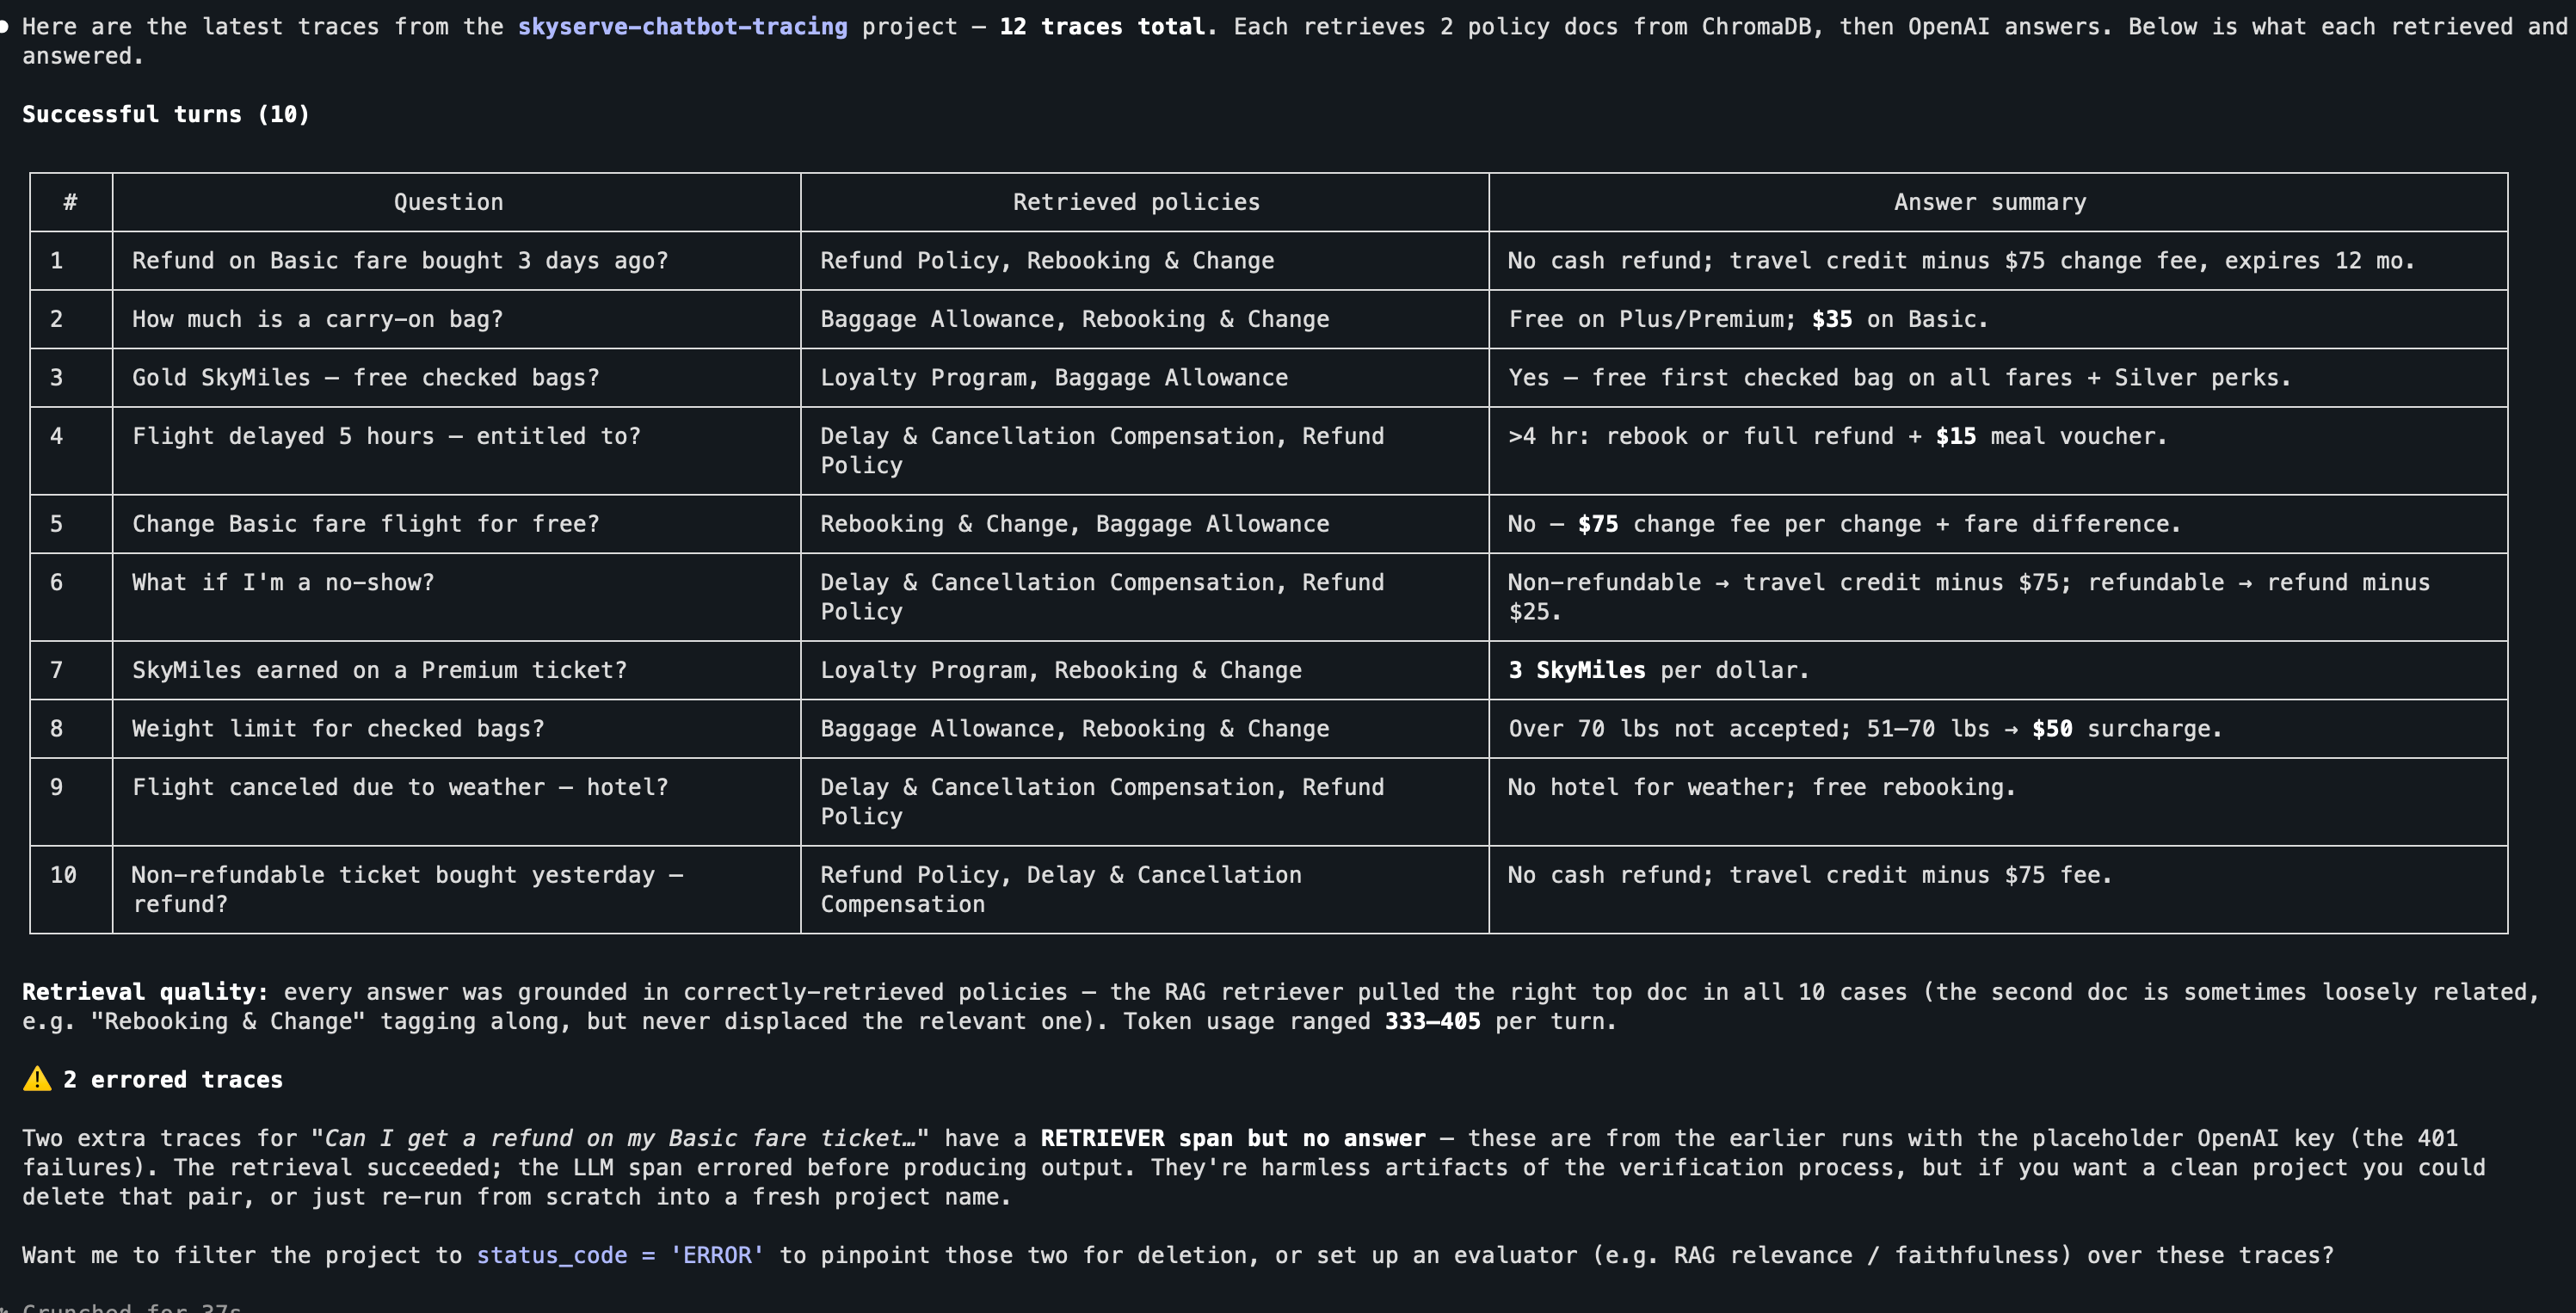
arize-traceExport recent spans from your project to inspect what each request did — what was retrieved, the LLM call, inputs and outputs — right in your editor, without leaving your agent. For example, you might say:
Export the latest traces from skyserve-chatbot and summarize what each request retrieved and answered
The same traces also appear under your skyserve-chatbot project in Arize AX, where you can expand any span tree to see the model, prompt, response, latency, and token counts.
Install the OpenInference instrumentor for your provider, register a tracer provider with your Arize credentials, and call .instrument().
Now add these lines to your app, before any OpenAI calls. Pick the tab that matches your data region — it’s the same region as the app subdomain you log in to (app.arize.com, app.eu-west-1a.arize.com, or app.ca-central-1a.arize.com).
That’s it. Every OpenAI call your app makes will now be captured and sent to Arize AX as a trace.
Arize AX supports auto-instrumentation for 30+ LLM providers and frameworks, including LangChain, LlamaIndex, Anthropic, and more. The pattern is always the same: register a tracer provider, then instrument.
Run the companion notebook (or your own app) to send some requests through the chatbot. The notebook includes 15 sample customer questions — a mix of straightforward ones and tricky edge cases.Here are a few of the questions it sends:
questions = [ "Can I get a refund on my Basic fare ticket I bought 3 days ago?", "How much does a carry-on bag cost?", "I'm a Gold SkyMiles member. Do I get free checked bags?", "My flight was delayed 5 hours. What am I entitled to?", "I bought a non-refundable ticket yesterday. Can I still get my money back?",]
Some of these have nuanced answers (the non-refundable ticket bought yesterday is refundable because of the 24-hour policy). These are exactly the kinds of edge cases where chatbots get tripped up — and where tracing is most valuable.
Look through your traces for a response that doesn’t look right. For example, find the trace for “Can I get a refund on my Basic fare ticket I bought 3 days ago?”The correct answer depends on whether the ticket is refundable or non-refundable — but the chatbot might give a generic answer. Click into the trace and look at the retrieved context: did the retrieval step pull the right policy document? Does the LLM response match what the document says?
Without tracing, you’d just know “the answer was wrong.” With tracing, you can see exactly where the breakdown happened — wrong document retrieved, correct document but LLM misinterpreted it, or the prompt didn’t give clear enough instructions.
You now have full visibility into every step of your chatbot’s reasoning — what documents it retrieved, what prompt was constructed, what the LLM returned, and how long each step took. You can spot problems instantly instead of guessing.But you’ve been manually clicking through traces to find problems. That works for 15 test questions, but your chatbot will handle hundreds or thousands of requests per day. You can’t review them all by hand.Next up: We’ll set up automated evaluations so Arize AX flags quality problems for you — no manual review required.


 The same traces also appear under your skyserve-chatbot project in Arize AX, where you can expand any span tree to see the model, prompt, response, latency, and token counts.

