What is an Evaluator?
An evaluator measures the quality or performance of your LLM application. It takes your application’s output (and optionally inputs) and produces a score or assessment. An evaluator consists of one of two configurations:-
LLM-as-a-Judge Evaluators:
- An LLM template (prompt that instructs the LLM how to evaluate)
- Rails (the possible output values/scoring scale)
- LLM configuration (model, provider, and parameters—configured when creating the evaluator) LLM-as-a-Judge evaluators are stored in the Eval Hub and can be reused across multiple tasks.
-
Code Evaluators:
- Code definition (Python code that performs the evaluation)
- Column mappings (which trace/span attributes to use as inputs) Code evaluators are defined inline when creating a task.
- Relevance: Does the response answer the question?
- Toxicity: Is the content safe and appropriate?
- Factual Accuracy: Are the claims in the response correct?
- Helpfulness: Is the response useful to the user?
- Your success metrics: Whatever success means for your agent or organization—evaluators can measure any quality dimension that matters to you
💡 Tip: Template evaluators are great for subjective quality measures, while code evaluators excel at objective checks (e.g., checking if a response contains required keywords or follows a specific format).
What is a Task?
A task is an automation that runs your evaluators on incoming production data. Think of it as a scheduled job that:- Continuously evaluates your traces/spans
- Applies filters to target specific data (e.g., only LLM spans)
- Runs evaluators at a specified sampling rate
- Attaches evaluation results directly to your traces
Prerequisites
Before setting up your first online evaluation, make sure you have:- Data source: You need either:
- Traces flowing into an Arize AX Project: Your application should be sending traces/spans to Arize. If you haven’t set this up yet, see our Tracing documentation.
- OR a Dataset with an Experiment: A dataset with an associated experiment to evaluate.
- LLM Integration configured: You’ll need an LLM provider integration set up for your evaluators. See AI Provider Integrations.
Step 1: Create an Evaluator
Navigate to Evaluators in the left sidebar. You’ll see two options at the top right: New Task and New Evaluator. Click New Evaluator to create your evaluator first. Choose your evaluator type:1. LLM-as-a-Judge Evaluator
LLM-as-a-Judge evaluators use an LLM to assess outputs based on a prompt template. These evaluators are stored in the Eval Hub and can be reused across multiple tasks.Arize provides pre-built evaluation templates tested against benchmarked datasets:
- Hallucination: Detects when outputs contain information not in the reference
- Relevance: Measures if responses are relevant to the input
- Toxicity: Detects harmful or inappropriate content
- Helpfulness: Assesses how useful the response is
- Q&A Correctness: Evaluates if answers are correct given reference documents
- Summarization: Checks if summaries accurately capture the input
- User Frustration: Detects signs of user frustration in conversations
- Code Generation: Evaluates code correctness and readability
- SQL Generation: Checks SQL query correctness
- Tool Calling: Validates function calls and extracted parameters
- Name: Give your evaluator a descriptive name
- LLM Config: Select the model, provider, and parameters for evaluation
Build a custom evaluator from scratch:
- Name: Give it a descriptive name
- Template: Write your evaluation prompt template with variables (e.g.,
{question},{response},{context}) - Rails: Define the possible output values/scoring scale
- LLM Config: Select which LLM to use for evaluation (model, provider, parameters)
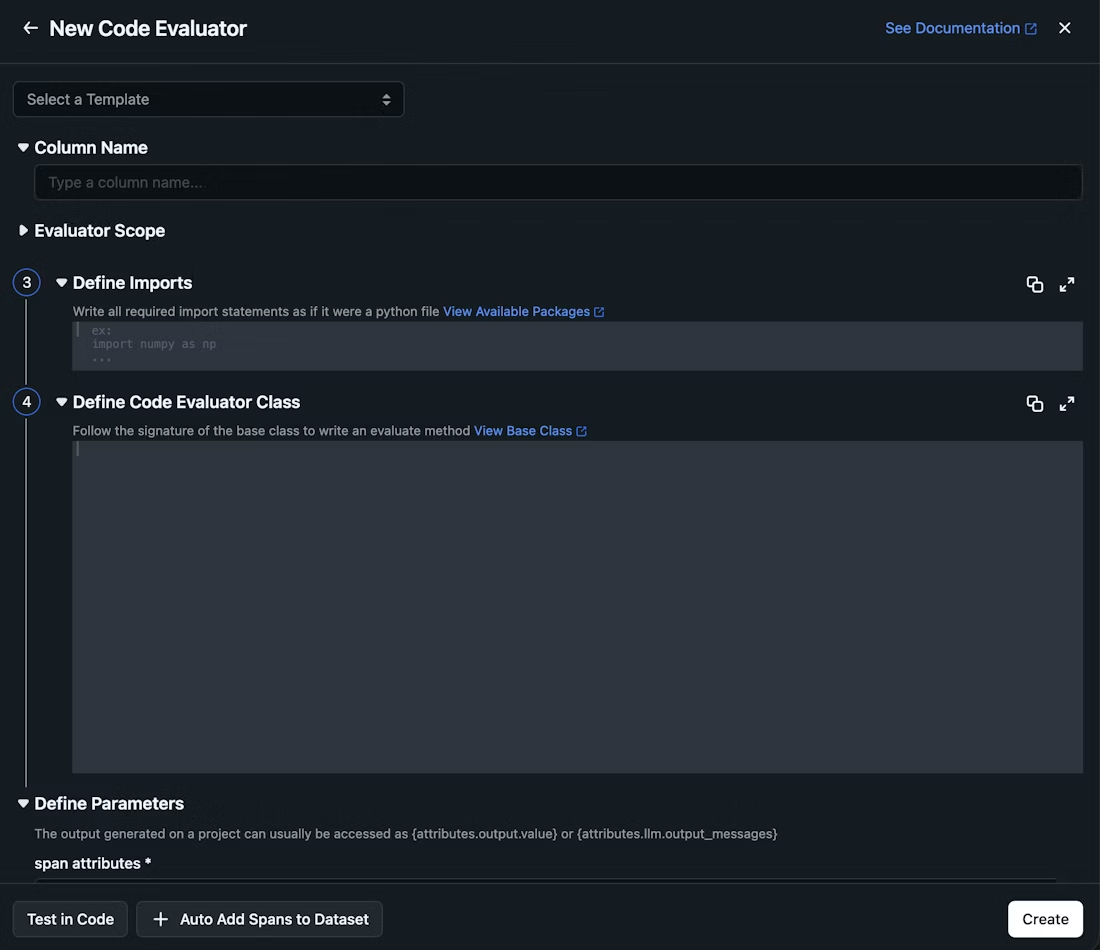
2. Code Evaluator
Code evaluators are not yet supported in the Eval Hub. To create a code evaluator, click New Task instead and select Code Evaluator. You can define a custom code evaluator or use one of the pre-built templates. After creating your code evaluator, proceed to Step 3: Configure the Task.
- Matches Regex: Check if text matches a regex pattern
- JSON Parseable: Validate JSON format
- Contains any Keyword: Check for presence of keywords
- Contains all Keywords: Ensure all specified keywords are present
Step 2: Use the Evaluator in a Task
Once you’ve created an LLM-as-a-Judge evaluator, you need to use it in a task to run evaluations on your data. There are two ways to do this: Option A: Create a New Task- From the Evaluators page, click New Task
- Select LLM-as-a-Judge
- Click Add Evaluator and select your evaluator from the Eval Hub
- Navigate to the Eval Hub tab on the Evaluators page
- Find your evaluator and click the Use Evaluator button
- This opens the task creation flow with your evaluator pre-selected
Step 3: Configure the Task
Configure where and how your evaluators should run.Select Data Source
Choose the data source for your task:- Project: Evaluate traces from a specific project. Your application should be sending traces/spans to Arize.
- Dataset: Evaluate examples from a dataset with an associated experiment.
Select Cadence (⚠️ only when Data Source is Project)
Choose when your task should run:- Run continuously on new incoming data (recommended for production): Task runs automatically every 2 minutes on new traces. Best for ongoing monitoring.
- Run once (historical): Task runs on a batch of existing data. Best for evaluating historical data or one-time assessments.
Configure Data Filters (⚠️ only when Data Source is Project)
Filters let you target specific subsets of your data:- Span Kind: Only evaluate specific span types (e.g., LLM spans)
- Model Name: Only evaluate specific models
- Metadata: Only evaluate spans with certain metadata tags
- Span Attributes: Filter on any span attribute
Configure Sampling Rate (⚠️ only when Data Source is Project)
Choose what percentage of your data to evaluate:- 100%: Evaluate every trace (useful for low-volume, critical applications)
- 10-50%: Common for high-volume applications to balance cost and coverage
- 1-5%: For very high-volume applications where you want representative sampling
💡 Tip: Start with a lower sampling rate (10-20%) and increase it once you’ve validated your evaluators are working correctly.
Step 4: Configure Evaluator Settings
This step applies to LLM-as-a-Judge evaluators added from the Eval Hub.
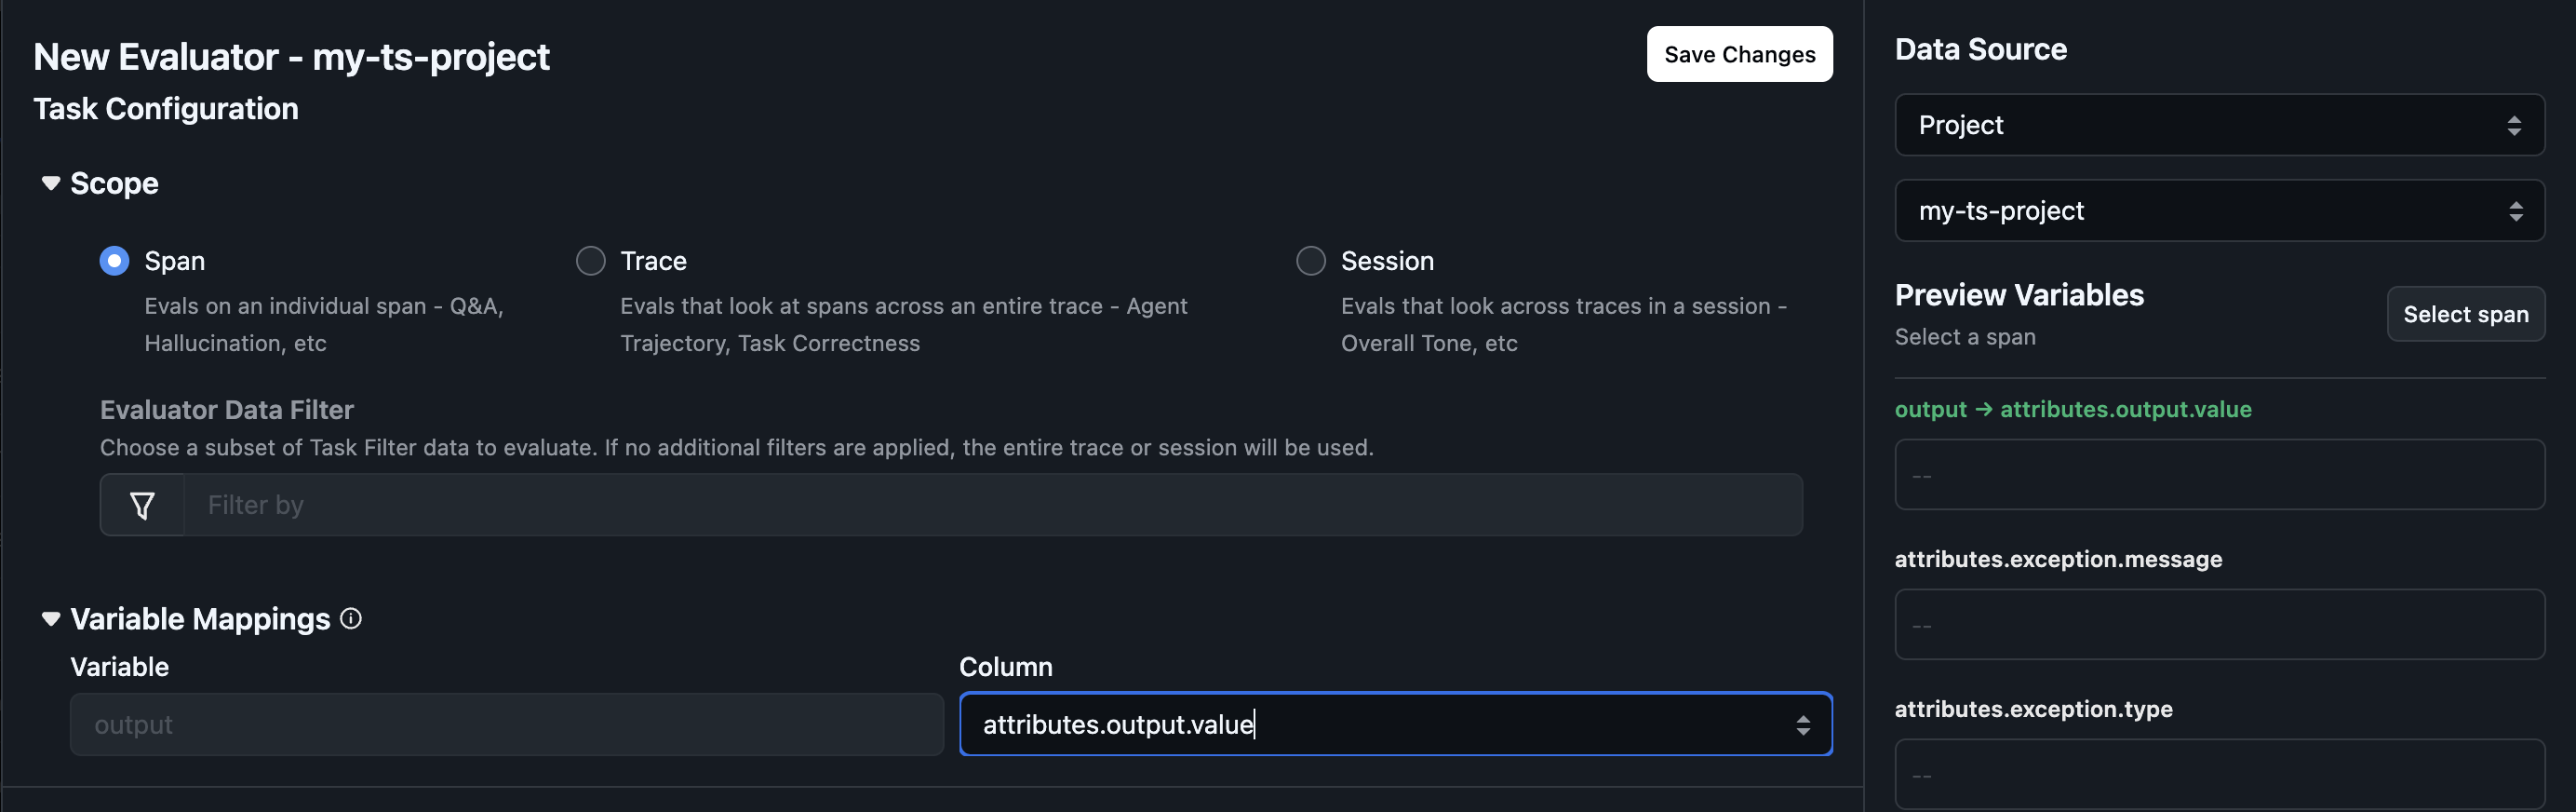
Evaluation Granularity (⚠️ only when Data Source is Project)
Choose the scope at which to run the evaluation:- Span: Evaluate individual spans (e.g., a single LLM call)
- Trace: Evaluate entire traces (the full request flow)
- Session: Evaluate across sessions (multi-turn conversations)
Column Mappings
If the task cannot find the evaluator’s prompt variables in your datasource, you’ll see a warning prompting you to configure column mappings. Column mappings connect template variables (e.g.,{question}, {response}, {context}) to actual columns in your datasource. This enables using the same evaluator across different datasets or projects with different column schemas.
How to configure:
- The column mappings panel displays all variables from the evaluator template
- For each variable, select the corresponding column from your datasource
- The
outputvariable is special—it refers to the LLM output
Step 5: Create Task and Monitor
- Review your task configuration and click Create Task
- Navigate to the Running Tasks tab to find your task
- Click View Logs to see detailed logs for each task run, including:
- Run timing and status
- Number of successes, errors, and skips
- Any error messages that occurred