> ## Documentation Index
> Fetch the complete documentation index at: https://arize-ax.mintlify.site/docs/llms.txt
> Use this file to discover all available pages before exploring further.
# Sync traces with Data Fabric
> Data Fabric continuously syncs your Arize AX traces, evaluations, and annotations to your own cloud data warehouse.
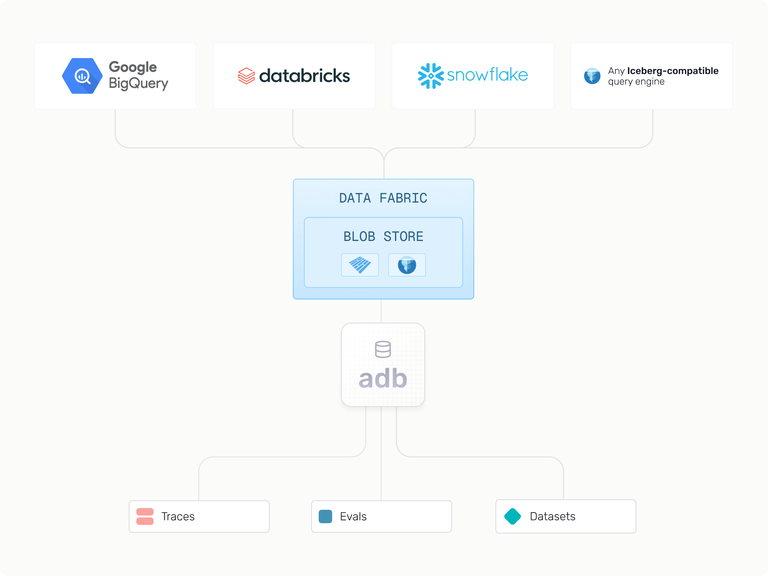
**Data Fabric** automatically syncs your production trace data, evaluations, and annotations from Arize AX to your own cloud data warehouse every 60 minutes, in open Iceberg format. You get a single, always-current source of truth you can query directly in BigQuery, Snowflake, Databricks, and other warehouses, with no export jobs to manage and no lock-in.
Data Fabric is currently on waitlist - reach out to Arize Support to get started.
Data Fabric is powered by **adb**, Arize's proprietary, AI-native online analytical processing (OLAP) database and the engine behind every managed Arize AX instance. adb stores your traces, evaluations, and annotations in open, standard formats, so Data Fabric can hand that data off to the warehouse of your choice without copying it into a proprietary format. For a deeper look at adb, see the [documentation](/docs/ax/concepts/adb/overview).
## Why is this better than a standard data export?
* **No lock-in:** Your data is always available to you. You can move it to data warehouse of your choice so you can use it in other tools you already use.
* **Single source of truth, always:** No need to maintain separate copies or manage export jobs
* **Automatic updates:** Your data, up-to-date. Any updates via evaluations or annotations, even on months-old data, are captured in the next sync regardless of timestamp. Data syncs every 60 minutes.
* **Query-ready format:** Data is stored in Iceberg format for direct querying in BigQuery, Snowflake, and other data warehouses
* **Time-partitioned:** Leverages Hive standard storage for efficient time-based queries
## Query and analyze synced traces
Once your traces land in the warehouse, they behave like any other table, with typed columns for tokens, cost, tool calls, latency, and evaluation scores. You can filter, aggregate, and join them with standard SQL instead of parsing unstructured logs. The value comes from joining traces against the business data already in your warehouse:
1. **Cost.** Join against your cloud billing export to see which prompt templates and sessions drive spend.
2. **Infrastructure.** Join against your warehouse's `INFORMATION_SCHEMA` to tell model latency apart from infrastructure contention, so you tune the right layer.
3. **Customer impact.** Join against CRM and revenue data to measure AI spend relative to account value and correlate evaluation scores with outcomes like CSAT.
Data Fabric syncs the data, but useful joins depend on your own data modeling: consistent session and user identifiers across systems, clear attribution between interactions and outcomes, and well-structured CRM and revenue tables.
## How does Data Fabric work?
* Data Fabric is only enabled for Enterprise accounts. Reach out to Arize Support ([support@arize.com](mailto:support@arize.com)) if you'd like to trial access.
* To set up Data Fabric, you must have write permissions to your target cloud storage bucket and at least one tracing project in your space
* Connectors are a connection to a filepath within your bucket. When you create a connector, you'll be able to specify a bucket and namespace, as well as projects to sync. You can add any number of projects or create one connector per project. Each connector must have a unique filepath.
* Once you've created your connectors and added your projects, your data will sync automatically every 60 minutes. This includes updates to historical data that may have changed.
* Project syncs can be paused, resumed or deleted as needed.
* **Supported Blobstore Providers:** Google Cloud Storage (GCS), Amazon S3, and Azure Blob Storage
* **Supported Big Table Providers**: BigQuery (GCS), Databricks Unity Catalog, and Snowflake
## Setting up Data Fabric
### Step 1: Create a Data Connector
1. Navigate to **Settings > Data Fabric** in your space
2. Click **New Connector**
3. Fill out the basic connector information:
1. **Connector Name:** A descriptive name for your connector
2. **Select Projects:** Choose which tracing projects to sync. You can modify these projects later
### Step 2: Configure Cloud Storage
1. **Select Data Storage:** Choose your cloud storage provider.
2. **File Path:** Enter your bucket path in the format shown below.
Enter your GCS path: `my-data-bucket/arize-sync/production`
Enter your S3 path: `my-bucket/optional-prefix`
Azure uses three separate fields instead of a single path:
1. **Storage Account Name:** `mystorageaccount`
2. **Container Name:** `my-container`
3. **Path (optional):** `arize-sync/production`
Arize AX writes your data to `abfss://my-container@mystorageaccount.dfs.core.windows.net/arize-sync/production`. Use this URI when you register external tables in your warehouse.
### Step 3: Set Up Permissions
1. **Label Your Bucket:** In the GCS bucket, set a bucket **label** with a key of `arize-ingestion-key` and the corresponding value copied from the setup dialog. This proves ownership of the bucket.
* Key: `arize-ingestion-key`
* Value: See setup dialog
2. **Create IAM Role:** Run the provided command to create a custom IAM role.
```bash theme={"theme":{"light":"github-light-default","dark":"github-dark-default"}}
gcloud iam roles create arizeDataFabric \
--project=YOUR_PROJECT_ID \
--title="Arize Data Fabric Role" \
--description="Custom IAM role for Arize Data Fabric" \
--permissions=storage.buckets.get,storage.objects.get,storage.objects.list,storage.objects.create,storage.objects.update,storage.objects.delete \
--stage=ALPHA
```
3. **Apply IAM Permissions:** Grant the IAM role permission to your bucket.
```bash theme={"theme":{"light":"github-light-default","dark":"github-dark-default"}}
gsutil iam ch serviceAccount:arize-data-fabric@production-269901.iam.gserviceaccount.com:projects//roles/arizeDataFabric
```
1. **Tag Your Bucket:** In the S3 bucket, add a bucket **tag** with a key of `arize-ingestion-key` and the corresponding value copied from the setup dialog. This proves ownership of the bucket.
* Key: `arize-ingestion-key`
* Value: See setup dialog
You can add the tag via the AWS Console or CLI:
```bash theme={"theme":{"light":"github-light-default","dark":"github-dark-default"}}
aws s3api put-bucket-tagging \
--bucket YOUR_BUCKET_NAME \
--tagging 'TagSet=[{Key=arize-ingestion-key,Value=YOUR_VALUE_FROM_SETUP_DIALOG}]'
```
2. **Create IAM Policy:** Create an IAM policy that grants the Arize Data Fabric service role access to your bucket.
```json theme={"theme":{"light":"github-light-default","dark":"github-dark-default"}}
{
"Version": "2012-10-17",
"Statement": [
{
"Effect": "Allow",
"Action": [
"s3:GetObject",
"s3:PutObject",
"s3:DeleteObject",
"s3:ListBucket",
"s3:GetBucketLocation",
"s3:GetBucketTagging"
],
"Resource": [
"arn:aws:s3:::YOUR_BUCKET_NAME",
"arn:aws:s3:::YOUR_BUCKET_NAME/*"
]
}
]
}
```
3. **Apply IAM Permissions:** Attach the policy to the Arize Data Fabric IAM role. The role ARN is provided in the setup dialog.
```bash theme={"theme":{"light":"github-light-default","dark":"github-dark-default"}}
aws iam put-role-policy \
--role-name arize-data-fabric \
--policy-name arize-data-fabric-s3-access \
--policy-document file://policy.json
```
The exact Arize IAM role ARN is provided in the Data Fabric setup dialog. Use this ARN when configuring trust policies or cross-account access.
Arize AX authenticates to your container as a multi-tenant Microsoft Entra ID application, so setup has three parts: register the Arize service principal in your tenant, grant it a role on the container, and prove you own the container.
1. **Enter your Azure Tenant ID:** The Microsoft Entra ID tenant that owns the storage account. Optionally add your **Subscription ID** and **Resource Group** so the setup dialog fills the commands below in with your values.
2. **Register the Arize service principal:** Run this once per tenant to create a service principal for the Arize application. Copy the app ID from the setup dialog.
```bash theme={"theme":{"light":"github-light-default","dark":"github-dark-default"}}
az ad sp create --id
```
3. **Grant the Storage Blob Data Contributor role:** Scope the assignment to the container you are syncing to. You can also do this in the Azure Portal under the container's **Access Control (IAM)** settings.
```bash theme={"theme":{"light":"github-light-default","dark":"github-dark-default"}}
az role assignment create \
--assignee \
--role "Storage Blob Data Contributor" \
--scope "/subscriptions//resourceGroups//providers/Microsoft.Storage/storageAccounts//blobServices/default/containers/"
```
4. **Tag Your Container:** On the container, add **metadata** with a key of `arize_ingestion_key` and the corresponding value copied from the setup dialog. This proves ownership of the container.
* Key: `arize_ingestion_key`
* Value: See setup dialog
You can add the metadata via the Azure Portal or CLI:
```bash theme={"theme":{"light":"github-light-default","dark":"github-dark-default"}}
az storage container metadata update \
--account-name \
--name \
--metadata arize_ingestion_key= \
--auth-mode login
```
Azure metadata names follow [C# identifier rules](https://learn.microsoft.com/en-us/rest/api/storageservices/setting-and-retrieving-properties-and-metadata-for-blob-resources), which do not allow hyphens. The Azure key uses underscores (`arize_ingestion_key`), unlike the hyphenated GCS label and S3 tag.
Azure role assignments can take up to 10 minutes to propagate. If validation fails the container access check right after you grant the role, wait and validate again.
### Step 4: Validate and Start Sync
1. **Validate:** Click Validate to verify your configuration
2. **Start Syncing:** Once validated, click Start Job to begin syncing. Your first sync will begin immediately and then continue every 60 minutes
### Step 5: Set Up Query Tables
1. **Allow the initial sync to complete:** Allow the first sync to complete. Sync time depends on data size and shape, and may vary.
2. **Create Table:** Once your data is syncing, create external tables to query the data directly. For each project being synced, create an external table using Iceberg or Delta format:
```sql theme={"theme":{"light":"github-light-default","dark":"github-dark-default"}}
CREATE EXTERNAL TABLE `your-project.your-dataset.your-table`
OPTIONS (
format = 'ICEBERG',
uris = ['gs://your-bucket/path/namespace/project-name/metadata/latest.metadata.json']
);
```
Once the first sync finishes, follow the standard Unity Catalog pattern for governing external S3 data: create a storage credential, create an external location that uses it, then register the Iceberg or Delta table at that location.
1. **Create a storage credential** that wraps the IAM role with access to the Arize sync bucket. See the Databricks [storage credentials docs](https://docs.databricks.com/aws/en/sql/language-manual/sql-ref-storage-credentials) for the full reference.
```sql theme={"theme":{"light":"github-light-default","dark":"github-dark-default"}}
CREATE STORAGE CREDENTIAL arize_data_fabric_cred
WITH AWS_IAM_ROLE 'arn:aws:iam::123456789012:role/arize-data-fabric'
COMMENT 'Credential for the Arize Data Fabric S3 sync bucket';
```
2. **Create an external location** that binds the credential to the Arize sync prefix in your bucket.
```sql theme={"theme":{"light":"github-light-default","dark":"github-dark-default"}}
CREATE EXTERNAL LOCATION arize_traces_loc
URL 's3://my-bucket/arize-sync/production'
WITH (CREDENTIAL arize_data_fabric_cred)
COMMENT 'Arize Data Fabric trace sync output';
```
3. **Register the external table** at the Iceberg metadata file under that location.
```sql theme={"theme":{"light":"github-light-default","dark":"github-dark-default"}}
CREATE TABLE my_catalog.arize_traces.agent_project
USING DELTA
LOCATION 's3://my-bucket/arize-sync/production/namespace/agent_project_a/metadata/latest.metadata.json';
```
Arize provides dual compatibility for both Delta and Iceberg formats without disrupting your existing Databricks pipelines. Unity Catalog seamlessly takes care of the rest, enforcing permissions, tracking end-to-end lineage, and maintaining audit logs across both formats.\\
Snowflake reads the synced tables through an external volume plus a catalog integration. Configure both once, then create one Iceberg table per synced project.
1. **Create an external volume** for the storage location your connector writes to. Snowflake supports external volumes on [Amazon S3](https://docs.snowflake.com/en/user-guide/tables-iceberg-configure-external-volume-s3), [Google Cloud Storage](https://docs.snowflake.com/en/user-guide/tables-iceberg-configure-external-volume-gcs), and [Azure Storage](https://docs.snowflake.com/en/user-guide/tables-iceberg-configure-external-volume-azure).
2. **Create a catalog integration** for Iceberg metadata that lives in object storage.
```sql theme={"theme":{"light":"github-light-default","dark":"github-dark-default"}}
CREATE OR REPLACE CATALOG INTEGRATION arize_data_fabric_catalog
CATALOG_SOURCE = OBJECT_STORE
TABLE_FORMAT = ICEBERG
ENABLED = TRUE;
```
3. **Create an Iceberg table** for each synced project. `METADATA_FILE_PATH` is relative to the root of your external volume.
```sql theme={"theme":{"light":"github-light-default","dark":"github-dark-default"}}
CREATE ICEBERG TABLE ..
EXTERNAL_VOLUME = ''
CATALOG = 'arize_data_fabric_catalog'
METADATA_FILE_PATH = '//metadata/latest.metadata.json';
```
Snowflake does not poll object storage for new Iceberg snapshots: [automated refresh](https://docs.snowflake.com/en/user-guide/tables-iceberg-auto-refresh) for object store catalog integrations requires `TABLE_FORMAT = DELTA`. Run [`ALTER ICEBERG TABLE REFRESH`](https://docs.snowflake.com/en/sql-reference/sql/alter-iceberg-table-refresh) to pick up each sync, and schedule it as an hourly Snowflake task to match the 60 minute sync cadence.
Support for Athena is coming soon. Reach out to Arize Support for early access.
## Frequently Asked Questions
* **How often does data sync?** Data syncs every 60 minutes automatically.
* **Can I sync multiple spaces to the same bucket?** Yes, you can configure multiple connectors to write to the same bucket using different namespaces or prefixes. For stronger access isolation, we recommend using separate buckets or prefixes per space. See [Access Control Best Practices](/docs/ax/security-and-settings/data-fabric/access-control) for details.
* **What happens if I delete a project that's being synced?** The sync will stop for that project, but existing data in your storage will remain.
* **Can I change the sync frequency?**\
Currently, the sync frequency is fixed at 60 minutes and cannot be customized. Customization is coming soon.\\
* **Is historical data included in the sync?** Yes, all historical data is included in the initial sync, and any changes to historical data between syncs will be included in the next sync.
* **What's the difference between Data Fabric and manual exports?** Data Fabric provides automatic, continuous syncing with evaluations and annotations, while exports are manual snapshots at a point in time.
To learn more about adb, see the concept pages: